Chapter 4. Particle Systems
“That is wise. Were I to invoke logic, however, logic clearly dictates that the needs of the many outweigh the needs of the few.” — Spock
In 1982, William T. Reeves, a researcher at Lucasfilm Ltd., was working on the film Star Trek II: The Wrath of Khan. Much of the movie revolves around the Genesis Device, a torpedo that when shot at a barren, lifeless planet has the ability to reorganize matter and create a habitable world for colonization. During the sequence, a wall of fire ripples over the planet while it is being “terraformed.” The term particle system, an incredibly common and useful technique in computer graphics, was coined in the creation of this particular effect.
“A particle system is a collection of many many minute particles that together represent a fuzzy object. Over a period of time, particles are generated into a system, move and change from within the system, and die from the system.” —William Reeves, "Particle Systems—A Technique for Modeling a Class of Fuzzy Objects," ACM Transactions on Graphics 2:2 (April 1983), 92.
Since the early 1980s, particle systems have been used in countless video games, animations, digital art pieces, and installations to model various irregular types of natural phenomena, such as fire, smoke, waterfalls, fog, grass, bubbles, and so on.
This chapter will be dedicated to looking at implementation strategies for coding a particle system. How do we organize our code? Where do we store information related to individual particles versus information related to the system as a whole? The examples we’ll look at will focus on managing the data associated with a particle system. They’ll use simple shapes for the particles and apply only the most basic behaviors (such as gravity). However, by using this framework and building in more interesting ways to render the particles and compute behaviors, you can achieve a variety of effects.
4.1 Why We Need Particle Systems
We’ve defined a particle system to be a collection of independent objects, often represented by a simple shape or dot. Why does this matter? Certainly, the prospect of modeling some of the phenomena we listed (explosions!) is attractive and potentially useful. But really, there’s an even better reason for us to concern ourselves with particle systems. If we want to get anywhere in this nature of code life, we’re going to need to work with systems of many things. We’re going to want to look at balls bouncing, birds flocking, ecosystems evolving, all sorts of things in plural.
Just about every chapter after this one is going to need to deal with a list of objects. Yes, we’ve done this with an array in some of our first vector and forces examples. But we need to go where no array has gone before.
First, we’re going to want to deal with flexible quantities of elements. Sometimes we’ll have zero things, sometimes one thing, sometimes ten things, and sometimes ten thousand things. Second, we’re going to want to take a more sophisticated object-oriented approach. Instead of simply writing a class to describe a single particle, we’re also going to want to write a class that describes the collection of particles—the particle system itself. The goal here is to be able to write a main program that looks like the following:
No single particle is ever referenced in the above code, yet the result will be full of particles flying all over the screen. Getting used to writing Processing sketches with multiple classes, and classes that keep lists of instances of other classes, will prove very useful as we get to more advanced chapters in this book.
Finally, working with particle systems is also a good excuse for us to tackle two other advanced object-oriented programming techniques: inheritance and polymorphism. With the examples we’ve seen up until now, we’ve always had an array of a single type of object, like "movers" or “oscillators.” With inheritance (and polymorphism), we’ll learn a convenient way to store a single list that contains objects of different types. This way, a particle system need not only be a system of a single type of particle.
Though it may seem obvious to you, I’d also like to point out that there are typical implementations of particle systems, and that’s where we will begin in this chapter. However, the fact that the particles in this chapter look or behave a certain way should not limit your imagination. Just because particle systems tend to look sparkly, fly forward, and fall with gravity doesn’t mean that those are the characteristics yours should have.
The focus here is really just how to keep track of a system of many elements. What those elements do and how those elements look is up to you.
4.2 A Single Particle
Before we can get rolling on the system itself, we have to write the class that will describe a single particle. The good news: we’ve done this already. Our Mover class from Chapter 2 serves as the perfect template. For us, a particle is an independent body that moves about the screen. It has location, velocity, and acceleration, a constructor to initialize those variables, and functions to display() itself and update() its location.
class Particle { PVector location;
PVector velocity;
PVector acceleration;
Particle(PVector l) {
location = l.get();
acceleration = new PVector();
velocity = new PVector();
}
void update() {
velocity.add(acceleration);
location.add(velocity);
}
void display() {
stroke(0);
fill(175);
ellipse(location.x,location.y,8,8);
}
}
This is about as simple as a particle can get. From here, we could take our particle in several directions. We could add an applyForce() function to affect the particle’s behavior (we’ll do precisely this in a future example). We could add variables to describe color and shape, or reference a PImage to draw the particle. For now, however, let’s focus on adding just one additional detail: lifespan.
Typical particle systems involve something called an emitter. The emitter is the source of the particles and controls the initial settings for the particles, location, velocity, etc. An emitter might emit a single burst of particles, or a continuous stream of particles, or both. The point is that for a typical implementation such as this, a particle is born at the emitter but does not live forever. If it were to live forever, our Processing sketch would eventually grind to a halt as the number of particles increases to an unwieldy number over time. As new particles are born, we need old particles to die. This creates the illusion of an infinite stream of particles, and the performance of our program does not suffer. There are many different ways to decide when a particle dies. For example, it could come into contact with another object, or it could simply leave the screen. For our first Particle class, however, we’re simply going to add a lifespan variable. The timer will start at 255 and count down to 0, when the particle will be considered “dead.” And so we expand the Particle class as follows:
class Particle {
PVector location;
PVector velocity;
PVector acceleration;
float lifespan;
Particle(PVector l) {
location = l.get();
acceleration = new PVector();
velocity = new PVector();
lifespan = 255;
}
void update() {
velocity.add(acceleration);
location.add(velocity);
lifespan -= 2.0;
}
void display() {
stroke(0,lifespan);
fill(175,lifespan);
ellipse(location.x,location.y,8,8);
}
}
The reason we chose to start the lifespan at 255 and count down to 0 is for convenience. With those values, we can assign lifespan to act as the alpha transparency for the ellipse as well. When the particle is “dead” it will also have faded away onscreen.
With the addition of the lifespan variable, we’ll also need one additional function—a function that can be queried (for a true or false answer) as to whether the particle is alive or dead. This will come in handy when we are writing the ParticleSystem class, whose task will be to manage the list of particles themselves. Writing this function is pretty easy; we just need to check and see if the value of lifespan is less than 0. If it is we return true, if not we return false.
boolean isDead() { if (lifespan < 0.0) {
return true;
} else {
return false;
}
}Before we get to the next step of making many particles, it’s worth taking a moment to make sure our particle works correctly and create a sketch with one single Particle object. Here is the full code below, with two small additions. We add a convenience function called run() that simply calls both update() and display() for us. In addition, we give the particle a random initial velocity as well as a downward acceleration (to simulate gravity).
Example 4.1: A single particle
Particle p;
void setup() {
size(640,360);
p = new Particle(new PVector(width/2,10));
}
void draw() {
background(255);
p.run();
if (p.isDead()) {
println("Particle dead!");
}
}
class Particle {
PVector location;
PVector velocity;
PVector acceleration;
float lifespan;
Particle(PVector l) {
acceleration = new PVector(0,0.05);
velocity = new PVector(random(-1,1),random(-2,0));
location = l.get();
lifespan = 255.0;
}
void run() {
update();
display();
}
void update() {
velocity.add(acceleration);
location.add(velocity);
lifespan -= 2.0;
}
void display() {
stroke(0,lifespan);
fill(0,lifespan);
ellipse(location.x,location.y,8,8);
}
boolean isDead() {
if (lifespan < 0.0) {
return true;
} else {
return false;
}
}
}
Exercise 4.1
Rewrite the example so that the particle can respond to force vectors via an applyForce() function.
Exercise 4.2
Add angular velocity (rotation) to the particle. Create your own non-circle particle design.
Now that we have a class to describe a single particle, we’re ready for the next big step. How do we keep track of many particles, when we can’t ensure exactly how many particles we might have at any given time?
4.3 The ArrayList
In truth, we could use a simple array to manage our Particle objects. Some particle systems might have a fixed number of particles, and arrays are magnificently efficient in those instances. Processing also offers expand(), contract(), subset(), splice(), and other methods for resizing arrays. However, for these examples, we’re going to take a more sophisticated approach and use the Java class ArrayList, found in the java.util package ArrayList Documentation.
Using an ArrayList follows the same idea as using a standard array, but with different syntax. The following two code examples (which assume the existence of a generic Particle class) produce the same result: first with an array, and second with an ArrayList.
The standard array way:
int total = 10;
Particle[] parray = new Particle[total];
void setup() {
for (int i = 0; i < parray.length; i++) {
parray[i] = new Particle();
}
}
void draw() {
for (int i = 0; i < parray.length; i++) {
Particle p = parray[i];
p.run();
}
}
The new ArrayList way:
int total = 10;
ArrayList<Particle> plist = new ArrayList<Particle>();
void setup() {
for (int i = 0; i < total; i++) {
plist.add(new Particle());
}
}
void draw() {
for (int i = 0; i < plist.size(); i++) { Particle p = plist.get(i);
p.run();
}
}
This last for loop looks pretty similar to our code that looped through a regular array by accessing each index. We initialize a variable called i to 0 and count up by 1, accessing each element of the ArrayList until we get to the end. However, this is a good time to mention the “enhanced for loop” available in Java (and Processing), which is a bit more concise. The enhanced loop works with both ArrayLists and regular arrays and looks like this:
ArrayList<Particle> plist = new ArrayList<Particle>();
for (Particle p: particles) {
p.run();
}
Let’s translate that. Say “for each” instead of “for” and say “in” instead of “:”. Now you have:
“For each Particle p in particles, run that Particle p!”
I know. You cannot contain your excitement. I can’t. I know it’s not necessary, but I just have to type that again.
for (Particle p : particles) {
p.run();
}
Simple, elegant, concise, lovely. Take a moment. Breathe. I have some bad news. Yes, we love that enhanced loop and we will get to use it. But not right now. Our particle system examples will require a feature that makes using that loop impossible. Let’s continue.
The code we’ve written above doesn’t take advantage of the ArrayList’s resizability, and it uses a fixed size of 10. We need to design an example that fits with our particle system scenario, where we emit a continuous stream of Particle objects, adding one new particle with each cycle through draw(). We’ll skip rehashing the Particle class code here, as it doesn’t need to change.
ArrayList<Particle> particles;
void setup() {
size(640,360);
particles = new ArrayList<Particle>();
}
void draw() {
background(255);
particles.add(new Particle(new PVector(width/2,50)));
for (int i = 0; i < particles.size(); i++) {
Particle p = particles.get(i);
p.run();
}
}
Run the above code for a few minutes and you’ll start to see the frame rate slow down further and further until the program grinds to a halt (my tests yielded horrific performance after fifteen minutes). The issue of course is that we are creating more and more particles without removing any.
Fortunately, the ArrayList class has a convenient remove() function that allows us to delete a particle (by referencing its index). This is why we cannot use the new enhanced for loop we just learned; the enhanced loop provides no means for deleting elements while iterating. Here, we want to call remove() when the particle’s isDead() function returns true.
for (int i = 0; i < particles.size(); i++) {
Particle p = particles.get(i);
p.run();
if (p.isDead()) {
particles.remove(i);
}
}Although the above code will run just fine (and the program will never grind to a halt), we have opened up a medium-sized can of worms. Whenever we manipulate the contents of a list while iterating through that very list, we can get ourselves into trouble. Take, for example, the following code.
for (int i = 0; i < particles.size(); i++) {
Particle p = particles.get(i);
p.run();
particles.add(new Particle(new PVector(width/2,50)));
}
This is a somewhat extreme example (with flawed logic), but it proves the point. In the above case, for each particle in the list, we add a new particle to the list (manipulating the size() of the ArrayList). This will result in an infinite loop, as i can never increment past the size of the ArrayList.
While removing elements from the ArrayList during a loop doesn’t cause the program to crash (as it does with adding), the problem is almost more insidious in that it leaves no evidence. To discover the problem we must first establish an important fact. When an object is removed from the ArrayList, all elements are shifted one spot to the left. Note the diagram below where particle C (index 2) is removed. Particles A and B keep the same index, while particles D and E shift from 3 and 4 to 2 and 3, respectively.
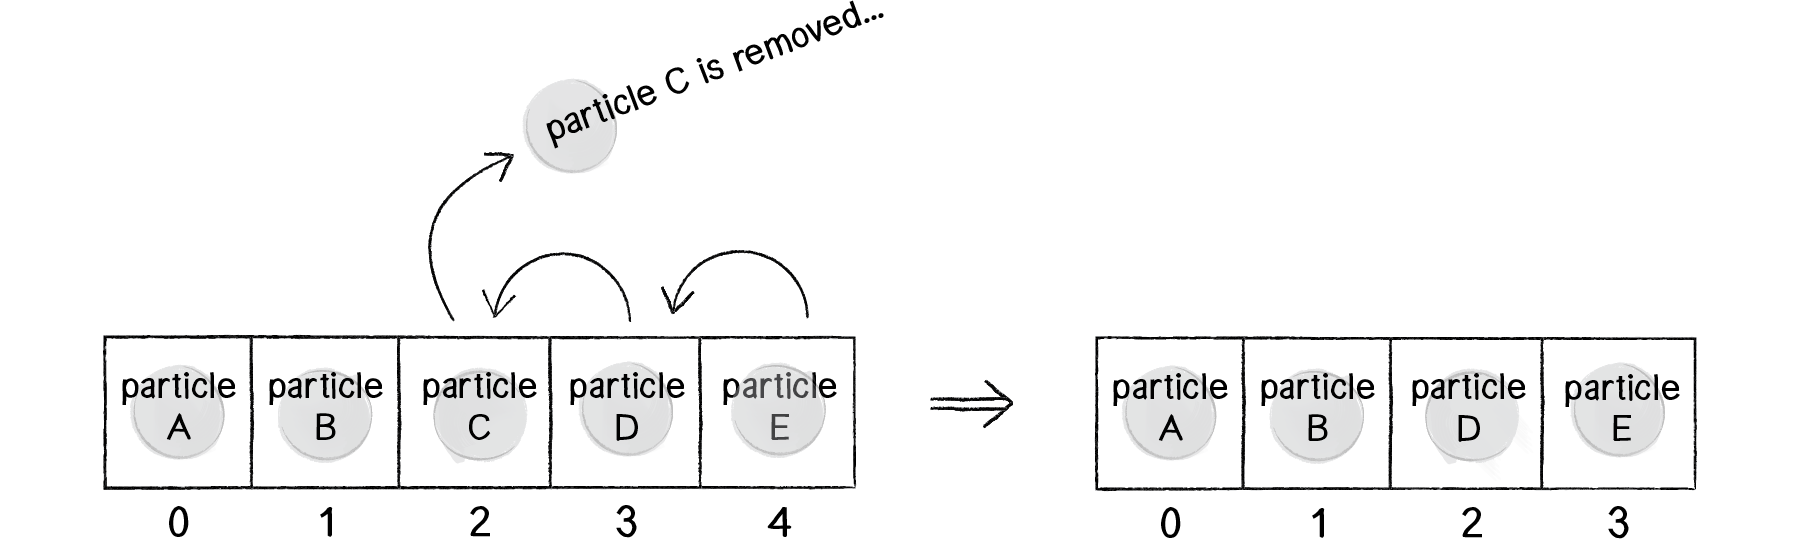
Figure 4.1
Let’s pretend we are i looping through the ArrayList.
when i = 0 → Check particle A → Do not delete
when i = 1 → Check particle B → Do not delete
when i = 2 → Check particle C → Delete!
Slide particles D and E back from slots 3 and 4 to 2 and 3
when i = 3 → Check particle E → Do not delete
Notice the problem? We never checked particle D! When C was deleted from slot #2, D moved into slot #2, but i has already moved on to slot # 3. This is not a disaster, since particle D will get checked the next time around. Still, the expectation is that we are writing code to iterate through every single element of the ArrayList. Skipping an element is unacceptable.
There are two solutions to this problem. The first solution is to simply iterate through the ArrayList backwards. If you are sliding elements from right to left as elements are removed, it’s impossible to skip an element by accident. Here’s how the code would look:
for (int i = particles.size()-1; i >= 0; i--) {
Particle p = (Particle) particles.get(i);
p.run();
if (p.isDead()) {
particles.remove(i);
}
}
This is a perfectly fine solution in ninety-nine cases out of a hundred. But sometimes, the order in which the elements are drawn could be important and you may not want to iterate backwards. Java provides a special class—Iterator—that takes care of all of the details of iteration for you. You get to say:
Hey, I’d like to iterate through this ArrayList. Could you continue to give me the next element in the list one at a time until we get to the end? And if I remove elements or move them around in the list while we’re iterating, will you make sure I don’t look at any elements twice or skip any by accident?
An ArrayList can produce an Iterator object for you.
Iterator<Particle> it = particles.iterator();Once you’ve got the iterator, the hasNext() function will tell us whether there is a Particle for us to run and the next() function will grab that Particle object itself.
while (it.hasNext()) {
Particle p = it.next();
p.run();
And if you call the remove() function on the Iterator object during the loop, it will delete the current Particle object (and not skip ahead past the next one, as we saw with counting forward through the ArrayList).
if (p.isDead()) { it.remove();
}
}
Putting it all together, we have:
Example 4.2: ArrayList of particles with Iterator
ArrayList<Particle> particles;
void setup() {
size(640,360);
particles = new ArrayList<Particle>();
}
void draw() {
background(255);
particles.add(new Particle(new PVector(width/2,50)));
Iterator<Particle> it = particles.iterator();
while (it.hasNext()) {
Particle p = it.next();
p.run();
if (p.isDead()) {
it.remove();
}
}
}4.4 The Particle System Class
OK. Now we’ve done two things. We’ve written a class to describe an individual Particle object. We’ve conquered the ArrayList and used it to manage a list of many Particle objects (with the ability to add and delete at will).
We could stop here. However, one additional step we can and should take is to write a class to describe the list of Particle objects itself—the ParticleSystem class. This will allow us to remove the bulky logic of looping through all particles from the main tab, as well as open up the possibility of having more than one particle system.
If you recall the goal we set at the beginning of this chapter, we wanted our main tab to look like this:
ParticleSystem ps;

void setup() {
  size(640,360);
  ps = new ParticleSystem();
}

void draw() {
  background(255);
  ps.run();
}
Let’s take the code from Example 4.2 and review a bit of object-oriented programming, looking at how each piece from the main tab can fit into the ParticleSystem class.
| ArrayList in the main tab | ArrayList in the ParticleSystem class |
|---|---|
ArrayList<Particle> particles;
void setup() {
size(640,360);
particles = new ArrayList<Particle>();
}
void draw() {
background(255);
particles.add(new Particle());
Iterator<Particle> it =
particles.iterator();
while (it.hasNext()) {
Particle p = it.next();
p.run();
if (p.isDead()) {
it.remove();
}
}
}
|
class ParticleSystem {
ArrayList<Particle> particles;
ParticleSystem() {
particles = new ArrayList<Particle>();
}
void addParticle() {
particles.add(new Particle());
}
void run() {
Iterator<Particle> it =
particles.iterator();
while (it.hasNext()) {
Particle p = it.next();
p.run();
if (p.isDead()) {
it.remove();
}
}
}
}
|
We could also add some new features to the particle system itself. For example, it might be useful for the ParticleSystem class to keep track of an origin point where particles are made. This fits in with the idea of a particle system being an “emitter,” a place where particles are born and sent out into the world. The origin point should be initialized in the constructor.
Example 4.3: Simple Single Particle System
class ParticleSystem {
ArrayList particles;
PVector origin;
ParticleSystem(PVector location) {
origin = location.get();
particles = new ArrayList();
}
void addParticle() {
particles.add(new Particle(origin));
}
4.5 A System of Systems
Let’s review for a moment where we are. We know how to talk about an individual Particle object. We also know how to talk about a system of Particle objects, and this we call a “particle system.” And we’ve defined a particle system as a collection of independent objects. But isn’t a particle system itself an object? If that’s the case (which it is), there’s no reason why we couldn’t also have a collection of many particle systems, i.e. a system of systems.
This line of thinking could of course take us even further, and you might lock yourself in a basement for days sketching out a diagram of a system of systems of systems of systems of systems of systems. Of systems. After all, this is how the world works. An organ is a system of cells, a human body is a system of organs, a neighborhood is a system of human bodies, a city is a system of neighborhoods, and so on and so forth. While this is an interesting road to travel down, it’s a bit beyond where we need to be right now. It is, however, quite useful to know how to write a Processing sketch that keeps track of many particle systems, each of which keep track of many particles. Let’s take the following scenario.
You start with a blank screen.
You click the mouse and generate a particle system at the mouse’s location.
Each time you click the mouse, a new particle system is created at the mouse’s location.
In Example 4.3, we stored a single reference to a ParticleSystem object in the variable ps.
ParticleSystem ps;
void setup() {
size(640,360);
ps = new ParticleSystem(1,new PVector(width/2,50));
}
void draw() {
background(255);
ps.run();
ps.addParticle();
}
For this new example, what we want to do instead is create an ArrayList to keep track of multiple instances of particle systems. When the program starts, i.e. in setup(), the ArrayList is empty.
Example 4.4: System of systems
ArrayList<ParticleSystem> systems;
void setup() {
size(600,200);
systems = new ArrayList<ParticleSystem>();
}
Whenever the mouse is pressed, a new ParticleSystem object is created and placed into the ArrayList.
void mousePressed() {
systems.add(new ParticleSystem(new PVector(mouseX,mouseY)));
}
And in draw(), instead of referencing a single ParticleSystem object, we now look through all the systems in the ArrayList and call run() on each of them.
void draw() {
background(255);
for (ParticleSystem ps: systems) {
ps.run();
ps.addParticle();
}
}
4.6 Inheritance and Polymorphism: An Introduction
You may have encountered the terms inheritance and polymorphism in your programming life before this book. After all, they are two of the three fundamental principles behind the theory of object-oriented programming (the other being encapsulation). If you’ve read other Processing or Java programming books, chances are it’s been covered. My beginner text, Learning Processing, has close to an entire chapter (#22) dedicated to these two topics.
Still, perhaps you’ve only learned about it in the abstract sense and never had a reason to really use inheritance and polymorphism. If this is true, you’ve come to the right place. Without these two topics, your ability to program a variety of particles and particle systems is extremely limited. (In the next chapter, we’ll also see how understanding these topics will help us to use physics libraries.)
Imagine the following. It’s a Saturday morning, you’ve just gone out for a lovely jog, had a delicious bowl of cereal, and are sitting quietly at your computer with a cup of warm chamomile tea. It’s your old friend So and So’s birthday and you’ve decided you’d like to make a greeting card in Processing. How about some confetti for a birthday? Purple confetti, pink confetti, star-shaped confetti, square confetti, fast confetti, fluttery confetti, etc. All of these pieces of confetti with different appearances and different behaviors explode onto the screen at once.
What we’ve got here is clearly a particle system—a collection of individual pieces of confetti (i.e. particles). We might be able to cleverly design our Particle class to have variables that store its color, shape, behavior, etc. And perhaps we initialize the values of these variables randomly. But what if your particles are drastically different? This could become very messy, having all sorts of code for different ways of being a particle in the same class. Well, you might consider doing the following:
class HappyConfetti {
}
class FunConfetti {
}
class WackyConfetti {
}
This is a nice solution: we have three different classes to describe the different kinds of pieces of confetti that could be part of our particle system. The ParticleSystem constructor could then have some code to pick randomly from the three classes when filling the ArrayList. Note that this probabilistic method is the same one we employed in our random walk examples in the Introduction.
class ParticleSystem {
ParticleSystem(int num) {
particles = new ArrayList();
for (int i = 0; i < num; i++) {
float r = random(1);
if (r < 0.33) { particles.add(new HappyConfetti()); }
else if (r < 0.67) { particles.add(new FunConfetti()); }
else { particles.add(new WackyConfetti()); }
}
}
OK, we now need to pause for a moment. We’ve done nothing wrong. All we wanted to do was wish our friend a happy birthday and enjoy writing some code. But while the reasoning behind the above approach is quite sound, we’ve opened up two major problems.
Problem #1: Aren’t we going to be copying/pasting a lot of code between the different “confetti” classes?
Yes. Even though our kinds of particles are different enough to merit our breaking them out into separate classes, there is still a ton of code that they will likely share. They’ll all have PVectors to keep track of location, velocity, and acceleration; an update() function that implements our motion algorithm; etc.
This is where inheritance comes in. Inheritance allows us to write a class that inherits variables and functions from another class, all the while implementing its own custom features.
Problem #2: How will the ArrayList know which objects are which type?
This is a pretty serious problem. Remember, we were using generics to tell the ArrayList what type of objects we’re going to put inside it. Are we suddenly going to need three different ArrayLists?
ArrayList<HappyConfetti> a1 = new ArrayList<HappyConfetti>();
ArrayList<FunConfetti> a2 = new ArrayList<FunConfetti>();
ArrayList<WackyConfetti> a3 = new ArrayList<WackyConfetti>();
This seems awfully inconvenient, given that we really just want one list to keep track of all the stuff in the particle system. That can be made possible with polymorphism. Polymorphism will allow us to consider objects of different types as the same type and store them in a single ArrayList.
Now that we understand the problem, let’s look at these two concepts in a bit more detail and then create a particle system example that implements both inheritance and polymorphism.
4.7 Inheritance Basics
Let’s take a different example, the world of animals: dogs, cats, monkeys, pandas, wombats, and sea nettles. We’ll start by programming a Dog class. A Dog object will have an age variable (an integer), as well as eat(), sleep(), and bark() functions.
class Dog {
int age;
Dog() {
age = 0;
}
void eat() {
println("Yum!");
}
void sleep() {
println("Zzzzzz");
}
void bark() {
println("WOOF!");
}
}Now, let’s move on to cats.
class Cat {
int age;
Cat() {
age = 0;
}
void eat() {
println("Yum!");
}
void sleep() {
println("Zzzzzz");
}
void meow() {
println("MEOW!");
}
}
As we rewrite the same code for fish, horses, koalas, and lemurs, this process will become rather tedious. Instead, let’s develop a generic Animal class that can describe any type of animal. All animals eat and sleep, after all. We could then say:
A dog is an animal and has all the properties of animals and can do all the things animals do. Also, a dog can bark.
A cat is an animal and has all the properties of animals and can do all the things animals do. Also, a cat can meow.
Inheritance makes this all possible. With inheritance, classes can inherit properties (variables) and functionality (methods) from other classes. A Dog class is a child (subclass) of an Animal class. Children will automatically inherit all variables and functions from the parent (superclass), but can also include functions and variables not found in the parent. Like a phylogenetic "tree of life," inheritance follows a tree structure. Dogs inherit from canines, which inherit from mammals, which inherit from animals, etc.
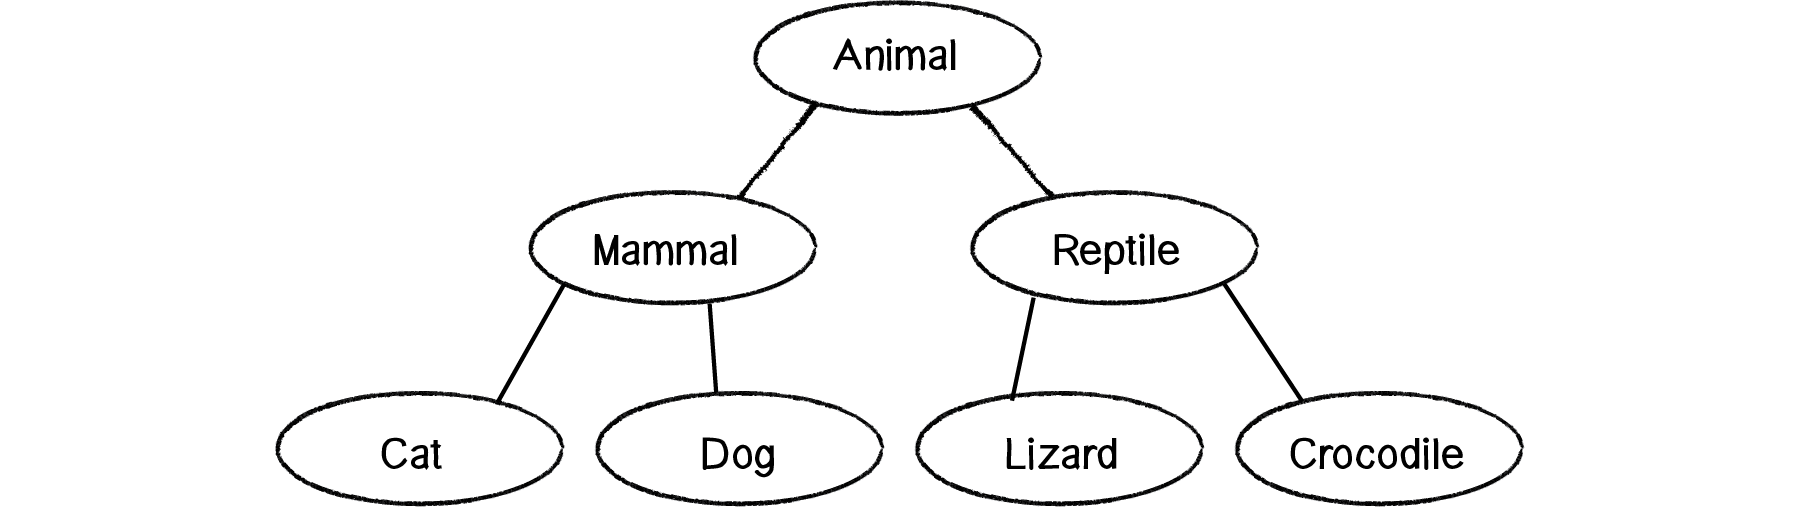
Figure 4.2
Here is how the syntax works with inheritance.
class Animal { int age;
Animal() {
age = 0;
}
void eat() {
println("Yum!");
}
void sleep() {
println("Zzzzzz");
}
}
class Dog extends Animal {
Dog() {
super();
}
void bark() {
println("WOOF!");
}
}
class Cat extends Animal {
Cat() {
super();
}
void meow() {
println("MEOW!");
}
}
This brings up two new terms:
extends – This keyword is used to indicate a parent for the class being defined. Note that classes can only extend one class. However, classes can extend classes that extend other classes, i.e. Dog extends Animal, Terrier extends Dog. Everything is inherited all the way down the line.
super() – This calls the constructor in the parent class. In other words, whatever you do in the parent constructor, do so in the child constructor as well. Other code can be written into the constructor in addition to super(). super() can also receive arguments if there is a parent constructor defined with matching arguments.
A subclass can be expanded to include additional functions and properties beyond what is contained in the superclass. For example, let’s assume that a Dog object has a haircolor variable in addition to age, which is set randomly in the constructor. The class would now look like this:
class Dog extends Animal { color haircolor;
Dog() {
super();
haircolor = color(random(255));
}
void bark() {
println("WOOF!");
}
}
Note how the parent constructor is called via super(), which sets the age to 0, but the haircolor is set inside the Dog constructor itself. If a Dog object eats differently than a generic Animal object, parent functions can be overridden by rewriting the function inside the subclass.
class Dog extends Animal {
color haircolor;
Dog() {
super();
haircolor = color(random(255));
}
void eat() { println("Woof! Woof! Slurp.")
}
void bark() {
println("WOOF!");
}
}
But what if a dog eats the same way as a generic animal, just with some extra functionality? A subclass can both run the code from a parent class and incorporate custom code.
class Dog extends Animal {
color haircolor;
Dog() {
super();
haircolor = color(random(255));
}
void eat() {
super.eat(); println("Woof!!!");
}
void bark() {
println("WOOF!");
}
}
4.8 Particles with Inheritance
Now that we’ve had an introduction to the theory of inheritance and its syntax, we can develop a working example in Processing based on our Particle class.
Let’s review a simple Particle implementation, further simplified from Example 4.1:
class Particle {
  PVector location;
  PVector velocity;
  PVector acceleration;
Particle(PVector l) {
acceleration = new PVector(0,0.05);
velocity = new PVector(random(-1,1),random(-2,0));
location = l.get();
}
void run() {
update();
display();
}
void update() {
velocity.add(acceleration);
location.add(velocity);
}
void display() {
fill(0);
ellipse(location.x,location.y,8,8);
}
}
Next, we create a subclass from Particle (let’s call it Confetti). It will inherit all the instance variables and methods from Particle. We write a new constructor with the name Confetti and execute the code from the parent class by calling super().
class Confetti extends Particle {
Confetti(PVector l) {
super(l);
}
void display() {
rectMode(CENTER);
fill(175);
stroke(0);
rect(location.x,location.y,8,8);
}
}Let’s make this a bit more sophisticated. Let’s say we want to have the Confetti particle rotate as it flies through the air. We could, of course, model angular velocity and acceleration as we did in Chapter 3. Instead, we’ll try a quick and dirty solution.
We know a particle has an x location somewhere between 0 and the width of the window. What if we said: when the particle’s x location is 0, its rotation should be 0; when its x location is equal to the width, its rotation should be equal to TWO_PI? Does this ring a bell? Whenever we have a value with one range that we want to map to another range, we can use Processing’s map() function, which we learned about in the Introduction!
float angle = map(location.x,0,width,0,TWO_PI);And just to give it a bit more spin, we can actually map the angle’s range from 0 to TWO_PI*2. Let’s look at how this code fits into the display() function.
void display() {
float theta = map(location.x,0,width,0,TWO_PI*2);
rectMode(CENTER);
fill(0,lifespan);
stroke(0,lifespan);
pushMatrix();
translate(location.x,location.y);
rotate(theta);
rect(0,0,8,8);
popMatrix();
}Exercise 4.7
Instead of using map() to calculate theta, how would you model angular velocity and acceleration?
Now that we have a Confetti class that extends our base Particle class, we need to figure out how our ParticleSystem class can manage particles of different types within the same system. To accomplish this goal, let’s return to the animal kingdom inheritance example and see how the concept extends into the world of polymorphism.
4.9 Polymorphism Basics
With the concept of inheritance under our belts, we can imagine how we would program a diverse animal kingdom using ArrayLists—an array of dogs, an array of cats, of turtles, of kiwis, etc. frolicking about.
ArrayList<Dog> dogs = new ArrayList<Dog>();
ArrayList<Cat> cats = new ArrayList<Cat>();
ArrayList<Turtle> turtles = new ArrayList<Turtle>();
ArrayList<Kiwi> kiwis = new ArrayList<Kiwi>();
for (int i = 0; i < 10; i++) {
dogs.add(new Dog());
}
for (int i = 0; i < 15; i++) {
cats.add(new Cat());
}
for (int i = 0; i < 6; i++) {
turtles.add(new Turtle());
}
for (int i = 0; i < 98; i++) {
kiwis.add(new Kiwi());
}
As the day begins, the animals are all pretty hungry and are looking to eat. So it’s off to looping time (enhanced looping time!)…
for (Dog d: dogs) {
d.eat();
}
for (Cat c: cats) {
c.eat();
}
for (Turtle t: turtles) {
t.eat();
}
for (Kiwi k: kiwis) {
k.eat();
}
This works well, but as our world expands to include many more animal species, we’re going to get stuck writing a lot of individual loops. Is this really necessary? After all, the creatures are all animals, and they all like to eat. Why not just have one ArrayList of Animal objects and fill it with all different kinds of animals?
ArrayList<Animal> kingdom = new ArrayList<Animal>();
for (int i = 0; i < 1000; i++) {
if (i < 100) kingdom.add(new Dog());
else if (i < 400) kingdom.add(new Cat());
else if (i < 900) kingdom.add(new Turtle());
else kingdom.add(new Kiwi());
}
for (Animal a: kingdom) {
a.eat();
}
The ability to treat a Dog object as either a member of the Dog class or the Animal class (its parent) is an example of polymorphism. Polymorphism (from the Greek polymorphos, meaning many forms) refers to the treatment of a single instance of an object in multiple forms. A dog is certainly a dog, but since Dog extends Animal, it can also be considered an animal. In code, we can refer to it both ways.
Dog rover = new Dog();
Animal spot = new Dog();
Although the second line of code might initially seem to violate syntax rules, both ways of declaring a Dog object are legal. Even though we declare spot as an Animal object, we’re really making a Dog object and storing it in the spot variable. And we can safely call all of the Animal class methods on spot because the rules of inheritance dictate that a dog can do anything an animal can.
What if the Dog class, however, overrides the eat() function in the Animal class? Even if spot is declared as an Animal, Java will determine that its true identity is that of a Dog and run the appropriate version of the eat() function.
This is particularly useful when we have an array or ArrayList.
4.10 Particle Systems with Polymorphism
Let’s pretend for a moment that polymorphism doesn’t exist and rewrite a ParticleSystem class to include many Particle objects and many Confetti objects.
class ParticleSystem { ArrayList<Particle> particles;
ArrayList<Confetti> confetti;
PVector origin;
ParticleSystem(PVector location) {
origin = location.get();
particles = new ArrayList<Particle>();
confetti = new ArrayList<Confetti>();
}
void addParticle() {
particles.add(new Particle(origin));
particles.add(new Confetti(origin));
}
void run() {
Iterator<Particle> it = particles.iterator();
while (it.hasNext()) {
Particle p = it.next();
p.run();
if (p.isDead()) {
it.remove();
}
}
it = confetti.iterator();
while (it.hasNext()) {
Confetti c = it.next();
c.run();
if (c.isDead()) {
it.remove();
}
}
}
}
Notice how we have two separate lists, one for particles and one for confetti. Every action we want to perform we have to do twice! Polymorphism allows us to simplify the above by just making one ArrayList of particles that contains both standard Particle objects as well as Confetti objects. We don’t have to worry about which are which; this will all be taken care of for us! (Also, note that the code for the main program and the classes has not changed, so we aren’t including it here. See the website for the full example.)
Example 4.5: Particle system inheritance and polymorphism
class ParticleSystem { ArrayList<Particle> particles;
PVector origin;
ParticleSystem(PVector location) {
origin = location.get();
particles = new ArrayList<Particle>();
}
void addParticle() {
float r = random(1);
if (r < 0.5) {
particles.add(new Particle(origin));
} else {
particles.add(new Confetti(origin));
}
}
void run() {
Iterator<Particle> it = particles.iterator();
while (it.hasNext()) {
Particle p = it.next();
p.run();
if (p.isDead()) {
it.remove();
}
}
}
}
4.11 Particle Systems with Forces
So far in this chapter, we’ve been focusing on structuring our code in an object-oriented way to manage a collection of particles. Maybe you noticed, or maybe you didn’t, but during this process we unwittingly took a couple steps backward from where we were in previous chapters. Let’s examine the constructor of our simple Particle class.
Particle(PVector l) { acceleration = new PVector(0,0.05);
velocity = new PVector(random(-1,1),random(-2,0));
location = l.get();
lifespan = 255.0;
}
And now let’s look at the update() function.
void update() {
velocity.add(acceleration);
location.add(velocity);
// Where is the line of code to clear acceleration?
lifespan -= 2.0;
}
Our Particle class is structured to have a constant acceleration, one that never changes. A much better framework would be to follow Newton’s second law (F = M* A) and incorporate the force accumulation algorithm we worked so hard on in Chapter 2.
Step 1 would be to add in the applyForce() function. (Remember, we need to make a copy of the PVector before we divide it by mass.)
void applyForce(PVector force) {
PVector f = force.get();
f.div(mass);
acceleration.add(f);
}
Once we have this, we can add in one more line of code to clear the acceleration at the end of update().
void update() {
velocity.add(acceleration);
location.add(velocity);
acceleration.mult(0);
lifespan -= 2.0;
}
And our Particle class is complete!
class Particle {
  PVector location;
  PVector velocity;
  PVector acceleration;
float lifespan;
float mass = 1;
Particle(PVector l) {
acceleration = new PVector(0,0);
velocity = new PVector(random(-1,1),random(-2,0));
location = l.get();
lifespan = 255.0;
}
void run() {
update();
display();
}
void applyForce(PVector force) {
PVector f = force.get();
f.div(mass);
acceleration.add(f);
}
void update() {
velocity.add(acceleration);
location.add(velocity);
acceleration.mult(0);
    lifespan -= 2.0;
  }

  void display() {
stroke(255,lifespan);
fill(255,lifespan);
ellipse(location.x,location.y,8,8);
}
boolean isDead() {
    if (lifespan < 0.0) {
      return true;
    } else {
      return false;
    }
}
}Now that the Particle class is completed, we have a very important question to ask. Where do we call the applyForce() function? Where in the code is it appropriate to apply a force to a particle? The truth of the matter is that there’s no right or wrong answer; it really depends on the exact functionality and goals of a particular Processing sketch. Still, we can create a generic situation that would likely apply to most cases and craft a model for applying forces to individual particles in a system.
Let’s consider the following goal: Apply a force globally every time through draw() to all particles. We’ll pick an easy one for now: a force pointing down, like gravity.
PVector gravity = new PVector(0,0.1);We said it should always be applied, i.e. in draw(), so let’s take a look at our draw() function as it stands.
void draw() {
background(100);
ps.addParticle();
ps.run();
}
Well, it seems that we have a small problem. applyForce() is a method written inside the Particle class, but we don’t have any reference to the individual particles themselves, only the ParticleSystem object: the variable ps.
Since we want all particles to receive the force, however, we can decide to apply the force to the particle system and let it manage applying the force to all the individual particles:
void draw() {
background(100);
PVector gravity = new PVector(0,0.1);
ps.applyForce(gravity);
ps.addParticle();
ps.run();
}
Of course, if we call a new function on the ParticleSystem object in draw(), well, we have to write that function in the ParticleSystem class. Let’s describe the job that function needs to perform: receive a force as a PVector and apply that force to all the particles.
Now in code:
void applyForce(PVector f) {
for (Particle p: particles) {
p.applyForce(f);
}
}
It almost seems silly to write this function. What we’re saying is “apply a force to a particle system so that the system can apply that force to all of the individual particles.” Nevertheless, it’s really quite reasonable. After all, the ParticleSystem object is in charge of managing the particles, so if we want to talk to the particles, we’ve got to talk to them through their manager. (Also, here’s a chance for the enhanced loop since we aren’t deleting particles!)
Here is the full example (assuming the existence of the Particle class written above; no need to include it again since nothing has changed):
Example 4.6: Particle system with forces
ParticleSystem ps;
void setup() {
size(640,360);
ps = new ParticleSystem(new PVector(width/2,50));
}
void draw() {
background(100);
PVector gravity = new PVector(0,0.1);
ps.applyForce(gravity);
ps.addParticle();
ps.run();
}
class ParticleSystem {
ArrayList<Particle> particles;
PVector origin;
ParticleSystem(PVector location) {
origin = location.get();
particles = new ArrayList<Particle>();
}
void addParticle() {
particles.add(new Particle(origin));
}
void applyForce(PVector f) {
for (Particle p: particles) {
p.applyForce(f);
}
}
void run() {
Iterator<Particle> it = particles.iterator();
while (it.hasNext()) {
Particle p = (Particle) it.next();
p.run();
if (p.isDead()) {
      it.remove();
    }
  }
}
}
4.12 Particle Systems with Repellers
What if we wanted to take this example one step further and add a Repeller object—the inverse of the Attractor object we covered in Chapter 2 that pushes any particles away that get close? This requires a bit more sophistication because, unlike the gravity force, each force an attractor or repeller exerts on a particle must be calculated for each particle.
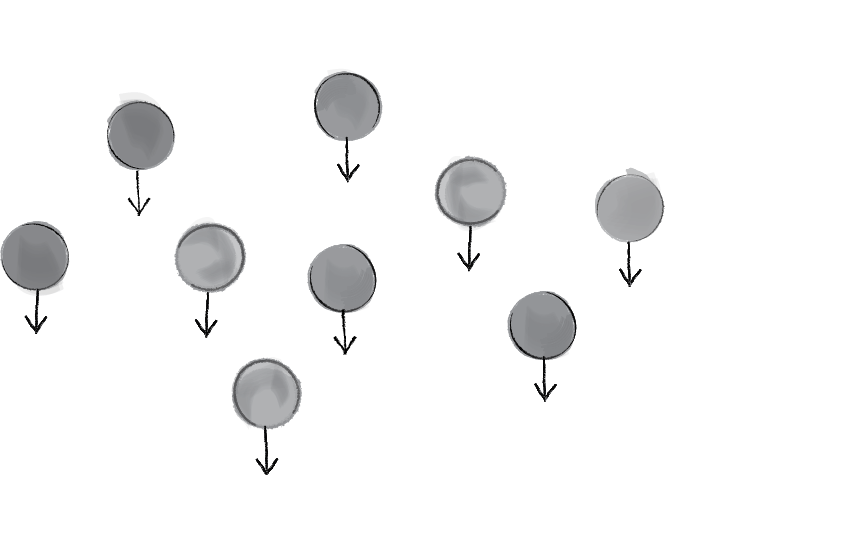
Figure 4.3: Gravity force—vectors are all identical
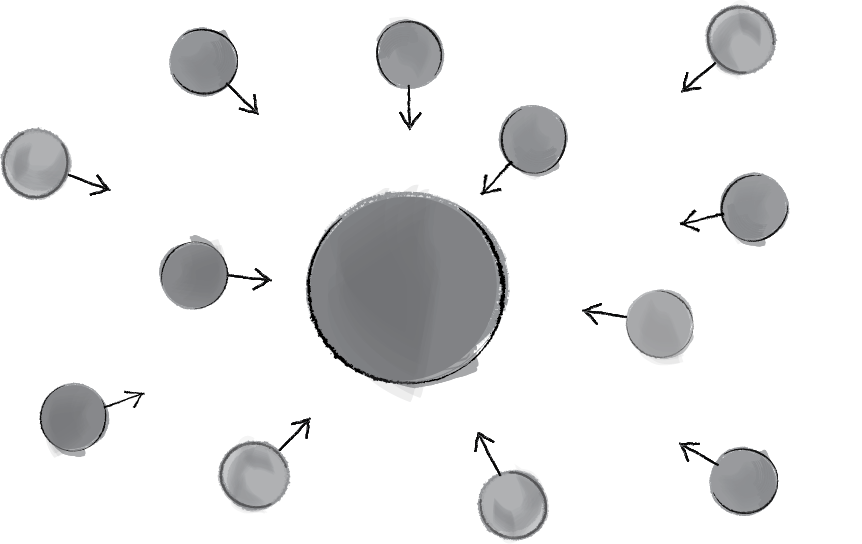
Figure 4.4: Attractor force—vectors are all different
Let’s start solving this problem by examining how we would incorporate a new Repeller object into our simple particle system plus forces example. We’re going to need two major additions to our code:
A Repeller object (declared, initialized, and displayed).
A function that passes the Repeller object into the ParticleSystem so that it can apply a force to each particle object.
ParticleSystem ps;Repeller repeller;
void setup() {
size(640,360);
ps = new ParticleSystem(new PVector(width/2,50));
repeller = new Repeller(width/2-20,height/2);
}
void draw() {
background(100);
ps.addParticle();
PVector gravity = new PVector(0,0.1);
ps.applyForce(gravity);
ps.applyRepeller(repeller);
ps.run();
repeller.display();
}
Making a Repeller object is quite easy; it’s a duplicate of the Attractor class from Chapter 2, Example 2.6 .
class Repeller { PVector location;
float r = 10;
Repeller(float x, float y) {
location = new PVector(x,y);
}
void display() {
stroke(255);
fill(255);
ellipse(location.x,location.y,r*2,r*2);
}
}
The more difficult question is, how do we write the applyRepeller() function? Instead of passing a PVector into a function like we do with applyForce(), we’re going to instead pass a Repeller object into applyRepeller() and ask that function to do the work of calculating the force between the repeller and all particles. Let’s look at both of these functions side by side.
| applyForce() | applyRepeller |
|---|---|
void applyForce(PVector f) {
for (Particle p: particles) {
p.applyForce(f);
}
}
|
void applyRepeller(Repeller r) {
for (Particle p: particles) {
PVector force = r.repel(p);
p.applyForce(force);
}
}
|
The functions are almost identical. There are only two differences. One we mentioned before—a Repeller object is the argument, not a PVector. The second difference is the important one. We must calculate a custom PVector force for each and every particle and apply that force. How is that force calculated? In a function called repel(), which is the inverse of the attract() function we wrote for the Attractor class.
PVector repel(Particle p) { PVector dir =
PVector.sub(location,p.location);
float d = dir.mag();
d = constrain(d,5,100);
dir.normalize(); float force = -1 * G / (d * d); dir.mult(force);
return dir;
}
Notice how throughout this entire process of adding a repeller to the environment, we’ve never once considered editing the Particle class itself. A particle doesn’t actually have to know anything about the details of its environment; it simply needs to manage its location, velocity, and acceleration, as well as have the ability to receive an external force and act on it.
So we can now look at this example in its entirety, again leaving out the Particle class, which hasn’t changed.
Example 4.7: ParticleSystem with repeller
ParticleSystem ps;Repeller repeller;
void setup() {
size(640,360);
ps = new ParticleSystem(new PVector(width/2,50));
repeller = new Repeller(width/2-20,height/2);
}
void draw() {
background(100);
ps.addParticle();
PVector gravity = new PVector(0,0.1);
ps.applyForce(gravity);
ps.applyRepeller(repeller);
ps.run();
repeller.display();
}
class ParticleSystem {
ArrayList<Particle> particles;
PVector origin;
ParticleSystem(PVector location) {
origin = location.get();
particles = new ArrayList<Particle>();
}
void addParticle() {
    particles.add(new Particle(origin));
  }
void applyForce(PVector f) {
for (Particle p: particles) {
p.applyForce(f);
    }
  }
void applyRepeller(Repeller r) {
for (Particle p: particles) {
PVector force = r.repel(p);
p.applyForce(force);
}
  }

  void run() {
Iterator<Particle> it = particles.iterator();
while (it.hasNext()) {
Particle p = (Particle) it.next();
p.run();
if (p.isDead()) {
it.remove();
  }
}
  }
}
class Repeller {
float strength = 100;
PVector location;
float r = 10;
Repeller(float x, float y) {
location = new PVector(x,y);
}
void display() {
stroke(255);
fill(255);
ellipse(location.x,location.y,r*2,r*2);
}
PVector repel(Particle p) {
    PVector dir =
      PVector.sub(location,p.location);
float d = dir.mag();
dir.normalize();
d = constrain(d,5,100);
float force = -1 * strength / (d * d);
    dir.mult(force);
    return dir;
  }
}
4.13 Image Textures and Additive Blending
Even though this book is really about behaviors and algorithms rather than computer graphics and design, I don’t think we would be able to live with ourselves if we went through a discussion of particle systems and never once looked at an example that involves texturing each particle with an image. The way you choose to draw a particle is a big part of the puzzle in terms of designing certain types of visual effects.
Let’s try to create a smoke simulation in Processing. Take a look at the following two images:
White circles
Fuzzy images with transparency
Both of these images were generated from identical algorithms. The only difference is that a white circle is drawn in image A for each particle and a “fuzzy” blob is drawn for each in B.

Figure 4.5
The good news here is that you get a lot of bang for very little buck. Before you write any code, however, you’ve got to make your image texture! I recommend using PNG format, as Processing will retain the alpha channel (i.e. transparency) when drawing the image, which is needed for blending the texture as particles layer on top of each other. Once you’ve made your PNG and deposited it in your sketch’s “data” folder, you are on your way with just a few lines of code.
First, we’ll need to declare a PImage object.
Example 4.8: Image texture particle system
PImage img;Load the image in setup().
void setup() { img = loadImage("texture.png");
}
And when it comes time to draw the particle, we’ll use the image reference instead of drawing an ellipse or rectangle.
void render() {
imageMode(CENTER);
tint(255,lifespan);
image(img,loc.x,loc.y);
}
Incidentally, this smoke example is a nice excuse to revisit the Gaussian number distributions from the Introduction. To make the smoke appear a bit more realistic, we don’t want to launch all the particles in a purely random direction. Instead, by creating initial velocity vectors mostly around a mean value (with a lower probability of outliers), we’ll get an effect that appears less fountain-like and more like smoke (or fire).
Assuming a Random object called “generator”, we could create initial velocities as follows:
float vx = (float) generator.nextGaussian()*0.3;
float vy = (float) generator.nextGaussian()*0.3 - 1.0;
vel = new PVector(vx,vy);
Finally, in this example, a wind force is applied to the smoke mapped from the mouse’s horizontal location.
void draw() {
background(0);
float dx = map(mouseX,0,width,-0.2,0.2);
PVector wind = new PVector(dx,0);
ps.applyForce(wind);
ps.run();
for (int i = 0; i < 2; i++) {
ps.addParticle();
  }
}
Exercise 4.11
Try creating your own textures for different types of effects. Can you make it look like fire, instead of smoke?
Exercise 4.12
Use an array of images and assign each Particle object a different image. Even though single images are drawn by multiple particles, make sure you don’t call loadImage() any more than you need to, i.e. once for each image file.
Finally, it’s worth noting that there are many different algorithms for blending colors in computer graphics. These are often referred to as “blend modes.” By default, when we draw something on top of something else in Processing, we only see the top layer—this is commonly referred to as a “normal” blend mode. When the pixels have alpha transparency (as they do in the smoke example), Processing uses an alpha compositing algorithm that combines a percentage of the background pixels with the new foreground pixels based on the alpha values.
However, it’s possible to draw using other blend modes, and a much loved blend mode for particle systems is “additive.” Additive blending in Processing was pioneered by Robert Hodgin in his famous particle system and forces exploration, Magnetosphere, which later became the iTunes visualizer. For more see: Magnetosphere.
Additive blending is in fact one of the simplest blend algorithms and involves adding the pixel values of one layer to another (capping all values at 255 of course). This results in a space-age glow effect due to the colors getting brighter and brighter with more layers.

To achieve additive blending in Processing, you’ll need to use the P2D or P3D renderer.
Example 4.9: Additive blending
void setup() { size(640,360,P2D);
}
Then, before you go to draw anything, you set the blend mode using blendMode():
void draw() { blendMode(ADD);
background(0);
}
Exercise 4.14
Try blending with other modes, such as SUBTRACT, LIGHTEST, DARKEST, DIFFERENCE, EXCLUSION,or MULTIPLY.
The Ecosystem Project
Step 4 Exercise:
Take your creature from Step 3 and build a system of creatures. How can they interact with each other? Can you use inheritance and polymorphism to create a variety of creatures, derived from the same code base? Develop a methodology for how they compete for resources (for example, food). Can you track a creature’s “health” much like we tracked a particle’s lifespan, removing creatures when appropriate? What rules can you incorporate to control how creatures are born?
(Also, you might consider using a particle system itself in the design of a creature. What happens if your emitter is tied to the creature’s location?)

